mxxhcm's blog

  • 首页

  • 标签

  • 分类

  • 归档

python 类和函数的属性

发表于 2019-04-14 | 更新于 2019-05-07 | 分类于 python

函数和类的默认属性

这里主要介绍类和函数的一些属性。
__dict__用来描述对象的属性。对于类来说,它内部的变量就是它的数量,注意,不是它的member variable,但是对于函数来说不是。对于类来说,而对于类对象来说,输出的是整个类的属性,而__dict__输出的是self.variable的内容。

python中的函数有很多特殊的属性(包括自定义的函数和库函数)

  • doc 输出用户定义的关于函数的说明
  • name 输出函数名字
  • module 输出函数所在模块的名字
  • dict 输出函数中的字典

示例:

1
2
3
4
5
6
7
8
9
10
11
12
13
def myfunc():
'this func is to test the __doc__'
myfunc.func_attr = "attr"
print("hhhh")

myfunc.func_attr1 = "first1"
myfunc.func_attr2 = "first2"

if __name__ == "__main__":
print(myfunc.__doc__)
print(myfunc.__name__)
print(myfunc.__module__)
print(myfunc.__dict__)

输出:

this func is to test the doc
myfunc
main
{‘func_attr1’: ‘first1’, ‘func_attr2’: ‘first2’}

类也有很多特殊的属性(包括自定义的类和库中的类)

  • doc 输出用户定义的类的说明
  • module 输出类所在模块的名字
  • dict 输出类中的字典

示例:

1
2
3
4
5
6
7
8
9
10
11
12
class MyClass:
"""This is my class __doc__"""
class_name = "cllll"
def __init__(self, test=None):
self.test = test
pass


if __name__ == "__main__":
print(MyClass.__dict__)
print(MyClass.__doc__)
print(MyClass.__module__)

输出:

{‘module’: ‘main’, ‘doc’: ‘This is my class doc’, ‘class_name’: ‘cllll’, ‘init’: <function MyClass.init at 0x7f1349d44510>, ‘dict’: <attribute ‘dict’ of ‘MyClass’ objects>, ‘weakref’: <attribute ‘weakref’ of ‘MyClass’ objects>}
This is my class doc
main

类的对象的属性

  • doc 输出用户定义的类的说明
  • module 输出类对象所在模块的名字
  • dict 输出类对象中的字典

示例

1
2
3
4
5
6
7
8
9
10
11
12
13
 1 class MyClass:
2 """This is my class __doc__"""
3 class_name = "cllll"
4 def __init__(self, test=None):
5 self.test = test
6 pass
7
8 if __name__ == "__main__":
9
10 cl = MyClass()
11 print(cl.__dict__)
12 print(cl.__doc__)
13 print(cl.__module__)

输出

{‘test’: None}
This is my class doc
main
python zip和enumerate

发表于 2019-04-13 | 更新于 2019-05-07 | 分类于 python

zip function

1
2
3
4
5
6
7
8
import numpy as np
a = np.zeros((2,2,2))
b = np.zeros((2,2,2))
c = np.zeros((2,2,2))
d = zip(a,b,c)
print(list(d))
d = list(zip(a,b,c))
e,f,g = d

这里d是一个什么呢,是多个tuple,数量是min(len(a),len(b),len©),每一个element是一个tuple,这个tuple的内容为(a[0],b[0],c[0]),…
打印出list(d)是一个list,这个list的长度为min(len(a),len(b),len©)每一个element是一个tuple,tuple的形状是((2,2),(2,2),(2,2))
用zip的话,就是看一下它的len,然后在第一维上对他们进行拼接,形成多个新的元组。
例子

1
2
3
4
5
a = (2,3)
b = (3,4)
c = (4,5)
d = zip(a,b,c)
print(list(c))

[(2,3),(3,4),(4,5)]

相当于吧tuple a和tuple b分别当做一个list的一个元组,然后结合成一个新的tuple的list,

enumerate(iterable, start=0)

1
2
3
4
5
seasons = ['Spring', 'Summer', 'Fall', 'Winter']
print(list(enumerate(seasons)))
print(list(enumerate(seasons, start=1)))
for i in enumerate(seansons):
print(i)

[(0, ‘Spring’), (1, ‘Summer’), (2, ‘Fall’), (3, ‘Winter’)]
[(1, ‘Spring’), (2, ‘Summer’), (3, ‘Fall’), (4, ‘Winter’)]
(0, ‘Spring’)
(1, ‘Summer’)
(2, ‘Fall’)
(3, ‘Winter’)

python time

发表于 2019-04-13 | 更新于 2019-05-07 | 分类于 python

time(time library,datetime library,panda.Timestamp())

import time

获得当前时间

1
time.time()        #获得当前timestamp

time.localtime(timestamp)

得到一个struct_time
time.struct_time(tm_year=2018…)

将struct time转换成string

Convert a tuple or struct_time representing a time as returned by gmtime() or localtime() to a string as specified by the format argument.If t is not provided,the current time as returned by localtime() is used.

1
2
3
import time
time.strftime(format,t) #将一个struct_time表示为一个格式化字符串
time.strftime("%Y-%m-%d %H:%M:%S",time.localtime())

将一个string类型的事件转换成struct time

Parse a string representing a time accroding to a format.The return value is a struct_time as returned by gmtime() or localtime()

1
2
3
import time
time.strptime("a string representing a time","a format") #将某个format表示的time转化为一个struct_time()
time.strptime("2014-02-01 00:00:00","%Y-%m-%d %H:%M:%S")

time.mktime()

将时间t转换成timestamp

python文件和目录操作(os和shutil)

发表于 2019-04-13 | 更新于 2019-10-11 | 分类于 python

文件和目录操作(os库和shutil库)

import os

查看信息

不是函数,而是属性
os.linesep #列出当前平台的行终止符
os.name #列出当前的平台信息

环境变量

os.getenv(key, default=None)
如果key存在,返回key对应的值,否则返回默认值None,也可以指定默认返回值。

列出目录

file_dir_list = os.listdir(parent_dir) #列出某个目录下的文件和目录,默认的话为当前目录
parent_dir 是一个目录
file_dir_list是一个list

os.path.exists(pathname) #判断pathname是否存在
os.path.isdir(pathname) #判断pathname是否是目录
os.path.isfile(pathname) #判断pathname是否是文件
os.path.isabs(pathname) #判断pathname是否是绝对路径

os.path.basename(pathname) # 列出pathname的dir
os.path.dirname(pathname) # 列出pathname的file name
os.path.split(pathname) #将pathname分为dir和filename
os.path.split(pathname) #将pathname的扩展名分离出来

os.path.join(“dir_name”,“file_name”) # 拼接两个路径

os.getcwd() #获得当前路径
os.chdir(pathname) #改变当前路径
os.path.expanduser(pathname) #如果pathname中包含"~",将其替换成/homre/user/

创建和删除

os.mkdir(pathname) #创建新目录
os.rmdir(pathname) #删除目录
os.makedirs("/home/mxxhcm/Documents/") #创建多级目录
os.removedirs() #删除多个目录
os.remove(file_pathname) #删除文件

os.rename(old_pathname,new_pathname) #重命名

打开文件

对于open文件来说,共有三种模式,分别为w,a,r
r的话,为只读,读取一个不存在的文件,会报错
r+的话,为可读写,读取一个不存在的文件,会报错
a的话,为追加读,读取一个不存在的文件,会创建该文件
w的话,为写入文件,读取一个不存在的文件,会创建改文件,打开一个存在的同名文件,会删除该文件,创建一个新的文件

读取文件

fp = open(file_path_name,“r+”)

read()将文件读到一个字符串中

file_str = fp.read()
fp.read()会返回一个字符串,包含换行符

readline()

for file_str in fp:
print(file_str)
这里的file_str是一个str类型变量

readlines()将文件读到一个列表中

list(fp)
file_list = fp.readlines()
filt_list是一个list变量

关闭文件

fp.close()
或者
with open(file_pathname, “r”) as f:
file_str = fp.read()
当跳出这个语句块的时候,文件已经别关闭了。

复制文件

shutil.move(‘test’,‘test_move’) # 递归的将文件或者目录移动到另一个位置。如果目标位置是一个目录,移动到这个目录里,如果目标已经存在而且不是一个目录,可能会用os.rename()重命名
shutil.copyfile(src,dst) #复制文件内容,metadata没有复制
shutil.copymode(src,dst) #copy权限。文件内容,owner和group不变。
shutil.copystat(src,dst) #copy权限,各种时间以及flags位。文件内容,owner,group不变
shutil.copy(src,dst) #copy file,权限为也会被copied
shutil.copy2(src,dst) #和先后调用shutil.copy()和shutil.copystat()函数一样
shutil.copytree(src,dst,symlinks=False,ignore=None) #递归的将str目录结构复制到dst,dst位置必须不存在,目录的权限和时间用copystat来复制,文件的赋值用copy2()来复制
shutil.rmtree(path[,ignore_errors[,onerror]]) #删除一个完整的目录,无论目录是否为空

参考文献

1.https://www.zhihu.com/question/48161511/answer/445852429
2.https://www.geeksforgeeks.org/python-os-getenv-method/

python regex

发表于 2019-04-13 | 更新于 2019-12-17 | 分类于 python

regex examples

1
2
3
4
5
6
7
8
9
10
11
12
13
14
15
16
17
18
19
20
21
22
23
24
25
import regex as re

# 找出每一行的数字
string = """a9apple1234
2banana5678
a3coconut9012"""
pattern = "[0-9]+"

# search
result = re.search(pattern, string)
print(type(result))
print(result[0])
print(result.group(0))

# match
# 即使设置了MULTILINE模式,也只会匹配string的开头而不是每一行的开头
result = re.match(pattern, string, re.S| re.M)
print(type(result))
# print(result[0])
# print(result.group(0))

# findall
result = re.findall(pattern, string)
print(type(result))
print(result)

语法

. 匹配除了newline的任意character,如果要匹配newline,需要添加re.DOTALL flag
* 重复至少$0$次
+ 重复至少$1$次
? 重复$0$次或者$1$次
{} 重复多少次,如a{3,5}表示重复$3-5$次
[] 匹配方括号内的内容,如[1-9]表示匹配$1-9$中任意一个
^ matching the start of the string
$ matching the end os the string
+,*.? 都是贪婪匹配,如果加一个?为非贪婪匹配
+?,*?,?? 为非贪婪匹配
() 匹配括号内的正则表达式,表示一个group的开始和结束
| 或
\number
\b 匹配empty string
\B
\d 匹配数字
\D 匹配非数字
\s 匹配空白符[ \t\n\r\f\v]
\S 匹配非空白符
\w 匹配unicode
\W
\A
\Z

模块

  • re.compile(patern, flags=0)
  • re.match(pattern, string, flags=0)
  • re.fullmatch(pattern,string,flags=0)
  • re.search(pattern, string, flags=0)
  • re.split(pattern, string, maxflit=0, flags=0)
  • re.findall(pattern,string,flags=0)
  • re.sub(pattern,repl,string,count=0,flags=0)
  • re.subn(pattern,repl,string,count=0,flags=0)

flags

flags can be re.DEBUG, re.I, re.IGNORECASE, re.L, re.LOCALE, re.M, re.MULTILINE, re.S, re.DOTALL, re.U, re.UNICODE, re.X, re.VERBOSE

  • re.I(re.IGNORECASE) 忽略大小写
  • re.L(re.LOCALE)
  • re.M(re.MULTILINE) 多行模式,设置以后.匹配newline。指定re.S时,’^'匹配string的开始和each line的开始(紧跟着each newline); '$'匹配string的结束和each line的结束($在newline之前,immediately preceding each newline)。如果不指定的话, '^‘只匹配string的开始,’$'只匹配string的结束和immediately before the newline (if any) at the end of the string,对应inline flag (?m).
  • re.S(re.DOTALL)
  • re.U(re.UNICODE)
  • re.X(re.VERBOSE)
  • re.DEBUG
1
2
3
4
5
6
7
8
9
10
11
12
13
14
15
16
17
18
import regex as re

print(re.I)
print(re.IGNORECASE)
print(re.L)
print(re.LOCALE)
print(re.M)
print(re.MULTILINE)
print(re.S)
print(re.DOTALL)
print(re.U)
print(re.UNICODE)
print(re.X)
print(re.VERBOSE)
print(re.DEBUG)

print(re.M is re.MULTILINE)
print(re.I is re.IGNORECASE)

re.M例子

1
2
3
4
5
6
7
8
9
10
11
12
13
14
15
16
17
18
text = """First line.
Second line.
Third line."""

pattern = "^.*$" # 匹配从开始到结束的任何字符
# 默认情况下, . 不匹配newlines,所以默认情况下不会有任何匹配结果,因为$之前有newline,而.不能匹配
# re.search(pattern, text) is None # Nothing matches!
print(re.search(pattern, text))

# 如果设置MULTILINE模式, $匹配每一行的结尾,这个时候第一行就满足要求了,设置MULTILINE模式后,$匹配string的结尾和每一行的结尾(each newline之前)
print(re.search(pattern, text, re.M).group())
# First line.

# 如果同时设置MULTILINE和DOTALL模式, .能够匹配newlines,所以第一行和第二行的newline都匹配了,在贪婪模式下,就匹配了整个字符串。
print(re.search(pattern, text, re.M | re.S).group())
# First line.
# Second line.
# Third line.

re.compile(patern, flags=0)

将一个正则表达式语句编译成一个正则表达式对象,可以调用正则表达式的match()和search()函数进行matching。

complie a regular expression pattern into a regular expression object,which can be used for matching using its match() and search()

1
2
3
4
5
6
7
8
str = "https://abc https://dcdf https://httpfn https://hello"
import regex as re

prog = re.compile(pattern)
results = prog.match(string)
# 上面两行等价于下面一行

results = re.match(pattern, string)

re.match(pattern, string, flags=0) or re.fullmatch(pattern,string,flags=0)

在给定的string开始位置进行查找,返回一个match object。即使设置了MULTILINE mode, re.match()也只会在string的开始而不是each line的每一行开始匹配。

re.search(pattern, string, flags=0)

在给定的string任意位置进行查找,返回一个match object。

locat a match anywhere in string

search() vs. match()

re.macth()在string的开头查找,而re.search在string的任意位置查找,他们都返回match object对象。如果不匹配,返回None。

1
2
3
4
5
6
7
8
9
10
11
12
13
14
15
16
17
18
19
import re

match1 = re.match("cd", "abcdef") # match
match2 = re.search("cd", "abcdef") # search
print(match1)
print(match2)
print(match2.group(0))
# None
# <regex.Match object; span=(2, 4), match='cd'>
# cd

with open("content.txt", "r") as f:
s = f.read()
match3 = re.match("cd", s) # match
match4 = re.search("cd", s)
print(match3)
print(match4)
# None
# <regex.Match object; span=(4, 6), match='cd'>

re.findall(pattern,string,flags=0)

查找字符string所有匹配pattern的字符

1
2
3
4
import regex as re
str = "https://abc https://dcdf https://httpfn https://hello"
p2 = "https.+? " # pay attention to space here
results = re.findall(p2,str)

['https://abc ', 'https://dcdf ', 'https://httpfn '] # pay attention to the last ,since the end of str is \n

re.split(pattern, string, maxflit=0, flags=0)

按照patten对string进行分割

1
2
3
4
import regex as re
str = "https://abc https://dcdf https://httpfn https://hello"
p1 = " "
results = re.split(p1,str)

[‘https://abc’, ‘https://dcdf’, ‘https://httpfn’, ‘https://hello’]

re.sub(pattern,repl,string,count=0,flags=0)

re.subn(pattern,repl,string,count=0,flags=0)

…

正则表达式对象(regular express object)

class re.RegexObject
只有re.compile()函数会产生正则表达式对象,正则

only re.compile() will create a direct regular express object,
it’s a special class which design for re.compile().
正则表达式对象支持下列方法和属性

  • match(string[,pos[,endpos]])
  • search(string[,pos[,endpos]])
  • findall(string[,pos[,endpos]])
  • split(string,maxsplit=0)
  • sub()
  • flags
  • groups
  • groupindex
  • pattern

match(string[,pos[,endpos]])

search(string[,pos[,endpos]])

findall(string[,pos[,endpos]])

split(string,maxsplit=0)

sub()

flags

groups

groupindex

pattern

匹配对象(match objects)

class re.MatchObject
匹配是否成功

match objects have a boolean value of True.

1
2
3
match = re.search(pattern, string)
if match:
processs(match)

MatchObject支持以下方法和属性

  • group([group1,…])
  • groups([default=None])
  • groupdict(default=None)
  • start([group])
  • end([group])
  • span([group])
  • pos
  • endpos
  • lstindex
  • lastgroup
  • re
  • string

group([group1,…])

group的话pattern需要多个()

groups([default])

返回一个元组

return a tuple containing all the subgroups of the match.

1
2
re.match(r"(\d+)\.(\d+)","24.1632")
m.groups()

(‘24’,‘1632’)

show default

1
2
m = re.match(r"(\d+)\.?(\d+)?", "24")
m.groups() # Second group defaults to None.

(‘24’, None)

change default to 0

1
2
m.groups('0')  # Now, the second group defaults to '0'.
('24', '0')

参考文献

1.https://stackoverflow.com/questions/180986/what-is-the-difference-between-re-search-and-re-match
2.https://devdocs.io/python~3.7/library/re
3.https://mail.python.org/pipermail/python-list/2014-July/674576.html

python数组初始化

发表于 2019-04-13 | 更新于 2019-06-09 | 分类于 python

array initialize

array_one_dimension = [ 0 for i in range(cols)]
array_multi_dimension = [[0 for i in range(cols)] for j in range(rows)]

numpy

  • numpy.array()
  • numpy.zeros()
  • numpy.empty()

返回np.ndarray数组

np.ndarray属性

ndarray.shape #array的shape
ndarray.ndim #array的维度
ndarray.size #the number of ndarray in array
ndarray.dtype #type of the number in array
ndarray.itemsize #size of the element in array
array[array > 0].size #统计一个数组有多少个非零元素,不论array的维度是多少

numpy.array()

np.array(object,dtype=None,copy=True,order=False,subok=False,ndim=0)

numpy.zeros()

np.zeros(shape,dtype=float,order=‘C’)

numpy.empty()

np.empty(shape,dtype=float,order=‘C’)

numpy.random.randn(shape)

np.random.randn(3,4)

numpy.arange()

numpy.linspace()

python2和python3中的dict

发表于 2019-04-13 | 更新于 2019-05-07 | 分类于 python

python2和python3的dict

将object转换为dict

vars([object]) -> dictionary

python2 dict

1
2
3
4
5
6
7
8
9
10
11
12
13
14
15
16
17
18
19
20
21
22
m_dict = {'a': 10, 'b': 20}

values = m_dict.values()
print(type(values))
print(values)
print("\n")

items = m_dict.items()
print(type(items))
print(items)
print("\n")

keys = m_dict.keys()
print(type(keys))
print(keys)
print("\n")

l_values = list(values)
print(type(l_values))
print(l_values)

输出:

python3 dict

1
2
3
4
5
6
7
8
9
10
11
12
13
14
15
16
17
18
19
m_dict = {'a': 10, 'b': 20}

values = m_dict.values()
print(type(values))
print(values) print("\n")

items = m_dict.items()
print(type(items))
print(items)
print("\n")

keys = m_dict.keys()
print(type(keys))
print(keys)
print("\n")

l_values = list(values)
print(type(l_values))
print(l_values)

输出:

python中的深复制和浅复制

发表于 2019-04-13 | 更新于 2019-05-07 | 分类于 python

简单赋值,浅拷贝,深拷贝

简单赋值

str

1
2
3
4
a = 'hello'
b = 'hello'
c = a
print(id(a),id(b),id(c))

2432356754632 2432356754632 2432356754632

这里打印出a,b,c的id是一样的,因为他们全是指向’hello’这个字符串在内存中的地址

1
2
a = 'world'
print(id(a),id(b),id(c))

2432356757376 2432356754632 2432356754632

将a指向一个新的字符串’world’,所以变量a的地址就改变了,指向字符串’world’的地址,但是b和c还是指向字符串’hello’的地址。

list

1
2
3
4
a = ['hello']
b = ['hello']
c = a
print(id(a),id(b),id(c))

2432356788424 2432356797064 2432356788424

1
2
b = ['world']
print(id(a),id(b),id(c))

2432356798024 2432356797064 2432356788424

结论

简单赋值是先给一个变量分配内存,然后把变量的地址赋值给一个变量名。
对于一些不可变的类型,比如str,int等,某一个值在内存中的地址是固定的,如果用赋值操作直接指向一个值的话,那么变量名指向的就是这个值在内存中地址。
比如a=‘hello’,b=‘hello’,这样a和b的id是相同的,都指向内存中hello的地址
对于一些可变的类型,比如list,因为他是可变的,所以如果用赋值操作指向同一个值的话,那么这几个变量的地址也不一样
比如a =[‘hello’],b=[‘hello’],这样a和b的id是不同的,虽然他们指向的值是一样的,

浅拷贝

1
2
3
4
5
6
7
8
a = ['hello' , [123] ]
b = a[:]
a = ['hello' , [123] ]
b = a[:]
print(a,b)
print(id(a),id(b))
print(id(a[0]),id(a[1]))
print(id(b[0]),id(b[1]))

[‘hello’, [123]] [‘hello’, [123]]
2432356775368 2432356775432 2432356754632 2432356774984
2432356754632 2432356774984

1
2
3
4
5
>>>a[0] = 'world'
>>> print(a,b)
>>> print(id(a),id(b))
>>> print(id(a[0]),id(a[1]))
>>> print(id(b[0]),id(b[1]))

[‘world’, [123]] [‘hello’, [123]]
2432356775368 2432356775432
2432356756424 2432356774984
2432356754632 2432356774984

1
2
3
4
5
a[1].append(3)
print(a,b)
print(id(a),id(b))
print(id(a[0]),id(a[1]))
print(id(b[0]),id(b[1]))

[‘world’, [123, 3]] [‘hello’, [123, 3]]
2432356775368 2432356775432
2432356756424 2432356774984
2432356754632 2432356774984

1
2
3
4
5
6
7
8
9
10
11
12
13
14
15
16
a[1] = [123]
print(a,b)
print(id(a),id(b))
print(id(a[0]),id(a[1]))
print(id(b[0]),id(b[1]))
```
> ['world', [123]] ['hello', [123, 3]]
2432356775368 2432356775432
2432356756424 2432356822984
2432356754632 2432356774984

### 深拷贝
``` python
from copy import deepcopy
a = ['hello',[123,234]
b = deepcopy(a)

a,b以及a,b中任何元素(除了str,int等类型)的地址都是不一样的

python special method

发表于 2019-04-13 | 更新于 2019-05-07 | 分类于 python

结论

print(object)就是调用了类对象object的__repr__()函数
如下代码

1
2
3
4
5
6
class Tem:
def __init__(self):
pass

def __repr__(self):
return "tem class"

声明类对象

Tem tem
下面两行代码的功能是一样的。

print(tem)
print(repr(tem))

基本的自定义方法

object.new

object.init

object.__repr__和object.str

1
2
3
4
5
6
7
8
9
10
11
12
13
14
15
16
17
18
19
20
21
22
23
24
25
26
27
28
29
class Tem(object):
pass

class TemStr(object):
def __str__(object):
return 'foo'

class TemRepr(object):
def __repr__(object):
return 'foo'

class TemStrRepr(object):
def __repr__(object):
return 'foo'
def __str__(object):
return 'foo_str'
if __name__ == "__main__":
tem = Tem()
print(str(tem))
print(repr(tem))
tem_str = TemStr()
print(str(tem_str))
print(repr(tem_str))
tem_repr = TemRepr()
print(str(tem_repr))
print(repr(tem_repr))
tem_str_repr = TemStrRepr()
print(str(tem_str_repr))
print(repr(tem_str_repr))

单独重载__repr__,str__也会调用__repr,
但是单独重载__str__,__repr__不会调用它。
__repr__面向的是程序员,而__str__面向的是普通用户。它们都用来返回一个字符串,这个字符串可以是任何字符串,我觉得这个函数的目的就是将对象转化为字符串。

object.bytes

自定义属性方法

object.getattr(self, name)

object.setattr(self, name)

比较

object.eq(self, others)

object.lt(self, others)

object.le(self, others)

object.ne(self, others)

object.gt(self, others)

object.ge(self, others)

特殊属性

object.dict

instance.class

gym介绍

发表于 2019-04-12 | 更新于 2019-12-17 | 分类于 强化学习

简介

强化学习中最主要的两类对象是“智能体”和“environment”,以及和这两类对象相关的一些概念:“reward”、“return”、“state”、“action”、“value”、“policy”、“predict”、“control”等,他们之间有着以下的关系:

  1. environment会对智能体采取的action做出回应。当智能体执行一个行为时,它需要根据environment本身的动力学来更新environment,也包括更新智能体状态,同时给以智能体一个反馈信息:即时奖励(immediate reward)。
  2. 对于智能体来说,它并不知道整个environment的所有信息,只能通过观测(observation)来获得所需要的信息,它能观测到的信息取决于问题的设置;同样因为智能体需要通过action与environment进行交互,智能体能采取哪些action,也要由智能体和environment协商好。因此environment要确定智能体的观测空间和action空间。
  3. 智能体还需要有一个决策功能,该功能根据当前observation来判断下一时刻该采取什么action,也就是决策过程。
  4. 智能体能执行一个确定的action。(这个刚开始还没想明白,智能体执行什么action干嘛,一般我们写代码不都是env.step(action),后来才想到是action本身就是智能体自己执行的,只不过代码是这么写,因为environment需要根据这个action,去更新智能体的状态以及environment的状态。)
  5. 智能体应该能从与environment的交互中学到知识,进而在与environment交互时尽可能多的获取reward,最终达到最大化累积奖励(accumate reward)的目的。
  6. environment应该给智能体设置一个(些)终止条件,即当智能体处在这个状态或这些状态之一时,交互结束,即产生一个完整的Episode。随后重新开始一个Episode或者退出交互。

自己实现一个environment

如果用代码表示上述关系,可以定义为如下式子:

1
2
3
4
5
6
7
8
9
10
11
12
13
14
15
16
17
18
19
20
21
22
23
24
25
26
27
28
29
30
31
32
33
34
35
class Environment(object):
self.aget_state #
self.states # 所有可能的状态集合
self.observation_space # 智能体的observation space
self.action_space # 智能体体的action space

# 给出智能体的immediate reward
def reward(self):
pass

# 根据智能体的动作,更新环境
def step(self, action):
pass

# 当前回合是否结束
def is_episode_end():
pass

# 生成智能体的obs
def obs_for_agent():
pass

class Agent(object):
self.env = env # 智能体依附于某一个环境
self.obs # 智能体的obs
self.reward # 智能体获得的immediate reward

# 根据当前的obs生成action
def policy(self, obs):
self.action

# 智能体观测到obs和reward
def observe(self):
self.obs =
self.reward =

Action space

Agent执行的actions可以是discrete,也可以是continuous,或者是discrete和continuous相结合的。Discrete actions是agent能够做的一系列操作,比如在地图中的上下左右操作,每一个action都是互斥的,他们不能同时发生。
一个continous action有一个值,比如说,可以是方向盘的一个具体角度,从-720到720;也可以是油门上施加的力的程度,从0到1。

Observation space

Observations是environment在每一个timestep返回的信息。它可以是几个数字,也可以是从cameras获得的多通道rgb图像。和action space一样,observation space可以是discrete,也可以是continuous。比如像灯泡的状态,有亮和不亮。

gym

gym库在设计environment和智能体的交互时基本上也是按照这几条关系来实现自己的规范和接口的。gym库的核心在文件core.py里,这里定义了两个最基本的类Env和Space。
Env类是所有environment类的基类,Space类是所有space类的基类,action space和observation都是基于Space类实现的。

Spaces

Space是一个抽象类,其中包含以下函数,以下几个全是abstract函数,需要在子类中实现

  • init(self, shape=None, dtype=None) 函数初始化shape和dtype以及初始化numpy随机数RandomState()对象。
  • sample(self) 函数进行采样,实际上是调用了numpy的随机函数。
  • contains(self, x) 函数判断某个对象x是否是这个space中的一个member。
  • seed(self, seed) 设置numpy随机数种子,这里使用的是RandomState对象,生成随机数,种子一定的情况下,采样的过程是一定的。
  • to_jsonable(self, sample_n)
  • from_jsonable(self, sample_n)

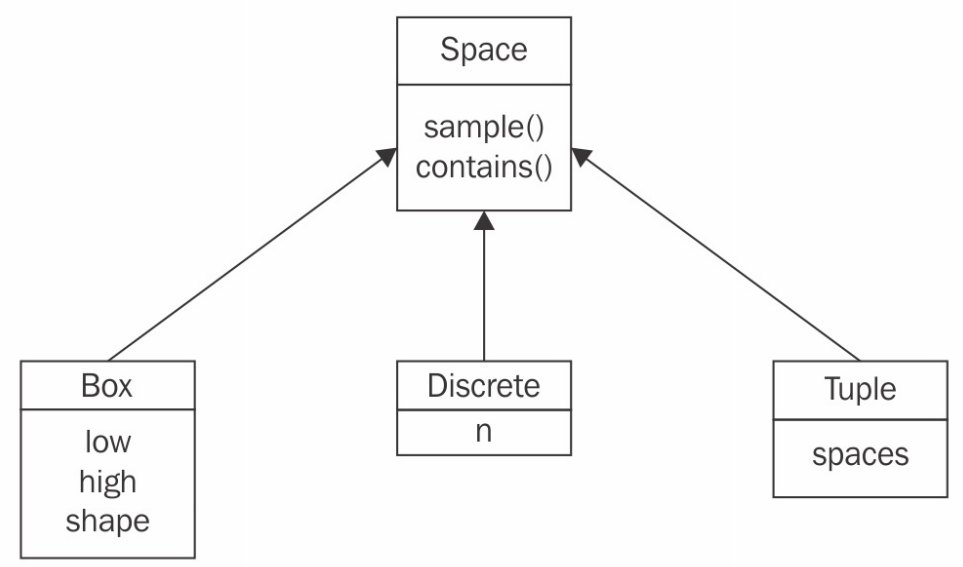
从Space基类派生出几个常用的Space子类,其中最主要的是Discrete类和Box类,其余的还有MultiBinary类,MultiDiscrete类,Tuple类等,每个子类重新实现了__repr__和__eq__以及几乎所有Space类中的函数。可以看以下类图:
class_diagram
最常见的Discrete和Box类,Discrete对应于一维离散空间,Box对应于多维连续空间。它们既可以应用在action space中,也可以用在state space,可以根据具体场景选择。

Discrete

说明

Discrete声明的时候需要给定一个整数,然后整个类的取值在${0, 1, \cdots, n-1}$之间。然后使用sample()函数采样,实际调用的是numpy的randint()进行采样,得到一个整数值。

示例

1
2
3
4
5
6
7
8
9
10
11
12
from gym import spaces

# 1.Discrete
# 取值是{0, 1, ..., n - 1}
print("==================")
dis = spaces.Discrete(8)
print(dis.shape)
print(dis.n)
print(dis)
dis.seed(4)
for _ in range(5):
print(dis.sample())

输出结果是:

==================
() # shape是None
8 # n为8
Discrete(8) # repr()函数的值
2
6
7
5
1

Box

说明

而Box类应用于连续空间,有两种初始化方式,一种是给出最小值,最大值和shape,另一种是直接给出最小值矩阵和最大值矩阵。然后使用sample()函数采样,实际上调用的是numpy的uniform()函数。

代码示例

1
2
3
4
5
6
7
8
9
10
11
12
13
14
15
from gym import spaces
# 2.Box
#
print("==================")
# def __init__(self, low=None, high=None, shape=None, dtype=None):
"""
Two kinds of valid input:
Box(low=-1.0, high=1.0, shape=(3,4)) # low and high are scalars, and shape is provided
Box(low=np.array([-1.0,-2.0]), high=np.array([2.0,4.0])) # low and high are arrays of the same shape
"""
box = spaces.Box(low=3.0, high=4, shape=(2,2))
print(box)
box.seed(4)
for _ in range(2):
print(box.sample())

输出结果是:

==================
Box(2, 2) # repr()函数的值
[[3.9670298 3.5472322]
[3.9726844 3.714816 ]]
[[3.6977289 3.2160895]
[3.9762745 3.0062304]]

Tuple

说明

当某些场景的state既有discrete也有continuous时,这就可以使用tuple了。举个例子来说,开车时,有三个连续控制组件:方向盘,刹车,油门等,它们可以用一个Box表示;此外还有一些离散的控制组件如转向灯(关闭,左转,右转等),喇叭(开,关)等。这就可以用tuple表示:

1
Tuple(spaces=(Box(low=-1.0, high=1.0, shape=(3,)), Discrete(n=3), Discrete(n=2)))

示例

这里给出一个应用场景,例如要描述一个$4\times 4$的网格世界,它一共有16个状态,每一个状态只需要用一个数字来描述即可,这样可以用Discrete(16)对象来表示这个问题的state space。
对于经典的小车爬山的问题,小车的state是用两个变量来描述,一个是小车对应目标旗杆的水平距离,另一个是小车的速度,因此environment要描述小车的state需要2个连续的变量。由于小车的state对智能体是完全可见的,因此小车的state space即是小车的observation space,此时不能用Discrete来表示,要用Box类,Box空间定义了多维空间,每一个维度用一个最小值和最大值来约束。同时小车作为智能体可以执行的action有3个:左侧加速、不加速、右侧加速。因此action space可以用Discrete来描述。最终,该environment类的观测空间和行为空间描述如下:

1
2
3
4
5
6
7
8
9
class Env(obejct):
self.min_position = -1.2
self.max_position = 0.6
self.max_speed = 0.07
self.goal_position = 0.5
self.low = np.array([self.min_position, -self.max_speed])
self.high = np.array([self.max_position, self.max_speed])
self.action_space = spaces.Discrete(3) # action space,是离散的
self.observation_space = spaces.Box(self.low, self.high) # 状态空间是连续的

Env

组成

OpenAI官方在gym.core.Env类中给出了如下的说明
The main OpenAI Gym class. It encapsulates an environment with arbitrary behind-the-scenes dynamics. An environment can be partially or fully observed.

常用属性(三个)

  • action_space: 环境中允许的actions的介绍
  • observation_space: 指定了环境给出的observation
  • reward_range: A tuple corresponding to the min and max possible rewards

Note: a default reward range set to [-inf,+inf] already exists. Set it if you want a narrower range.

常用方法(五个)

  • step
  • reset
  • render
  • close
  • seed

The methods are accessed publicly as “step”, “reset”, etc… The non-underscored versions are wrapper methods to which we may add functionality over time.

智能体主要通过环境的几个方法进行交互,用户如果要编写自己的环境的话,需要实现seed, reset, step, close, render等函数。

step函数执行一个时间步的更新。

说明

Accepts an action and returns a tuple (observation, reward, done, info).
输入参数:
action (object):智能体执行的动作
返回值:

  • observation (object): 环境的observation,一个numpy数组,
  • reward (float) : 采取输入的action之后环境给出的reward
  • done (boolean): 当前episode是否结束,一个bool变量
  • extra_info (dict): 调试信息,一般情况下会忽略,是一个dict,可能是当前agent还有多少条命。

每一次调用step(),都会执行以下操作:

  1. 告诉env在接下来的一个timestep中采取什么action
  2. 获得一个新的observation
  3. 获得一个新的reward
  4. 获得当前episode是否结束
  5. 获得其他额外信息。

reset函数重置

不接收输入参数,重置环境并返回初始的observation。
Returns: observation (object): 将环境重置为初始状态,返回环境的初始observation

reder函数绘制

Renders the environment.

close函数回收garbge

在使用完之后调用close函数清理内存

seed函数设置环境的随机数种子

使用seed函数设置随机数种子,使得结果可以复现。

创建一个environment

在使用Env类的时候,一种是使用gym中自带的已经注册了的类,另一种是使用自己编写的类。

gym中自带的envs

gym中有很多很多个自带的environments。拿gym 0.9.3来说,总共有777个环境(包含同一种env的不同变种),116个unique env,他们可以分为以下几类:

  • 经典的控制问题:这类问题很简单,但是可以用来检查模型的实现。
  • Atari 2600, 63 unique游戏
  • Board games
  • Box2D
  • MuJoCo
  • Parameter tunning
  • Toy text
  • PyGame
  • Doom

具体的可以查看https://gym.openai.com/envs/#classic_control。

代码实例

第一种的话,使用如下语句注册:

1
2
3
4
5
6
7
8
9
10
11
12
13
14
15
16
17
18
import gym
env = gym.make("CartPole-v0")

print(type(env.action_space))
# Discrete
print(env.action_space.n)
# 2, action的取值就是0和1,0向左推,1向右推
print(env.action_space.shape)
# ()
print(type(env.observation_space))
# Box
print(env.observation_space.shape)
# (4,)

s_0 = env.reset()
print(s_0)
s_1, r_1, done_1, info_1 = env.step(0)
print(s_1)

RandomAgent示例

1
2
3
4
5
6
7
8
9
10
11
12
13
14
15
16
17
18
19
20
21
import gym
import time

if __name__ == "__main__":
env = gym.make("CartPole-v0")
total_reward = 0.0
total_steps = 0
obs = env.reset()
episode = 1
while True:
action = env.action_space.sample()
obs, reward, done, _ = env.step(action)
total_reward += reward
total_steps += 1
env.render()
if done:
print("Episode %d done in %d steps, total reward %.2f" %(episode, total_steps, total_reward))
time.sleep(1)
env.reset()
episode += 1
total_reward = 0

自己声明envs

另一种自己编写的环境类是和普通的python 类对象声明一样。

Some issues

1.>gym.error.DeprecatedEnv: Env PongDeterministic-v4 not found (valid versions include [‘PongDeterministic-v3’, ‘PongDeterministic-v0’])
gym版本太老了,升级一下就行[2]。这个是gym$0.7.0$遇到的问题。
2.>UserWarning: WARN: <class ‘envs.AtariRescale42x42’> doesn’t implement ‘observation’ method. Maybe it implements deprecated ‘_observation’ method.
这个是gym版本太新了,apis进行了重命名。这个是gym$0.12.0$遇到的问题。
上面两个问题都是在测试github上的一个A3C代码遇到的。最后装了$0.9$版本的gym就没有警告了。(测试了一下,装$0.10$版本的也不行)

参考文献

1.https://github.com/openai/gym
2.https://github.com/ikostrikov/pytorch-a3c/issues/36
3.https://github.com/openai/roboschool/issues/169
4.https://www.packtpub.com/big-data-and-business-intelligence/deep-reinforcement-learning-hands

1…282930…34
马晓鑫爱马荟荟

马晓鑫爱马荟荟

记录硕士三年自己的积累

337 日志
26 分类
77 标签
RSS
GitHub E-Mail
© 2022 马晓鑫爱马荟荟
由 Hexo 强力驱动 v3.8.0
|
主题 – NexT.Pisces v6.6.0